A Notable Production
Introduction:
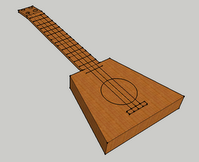
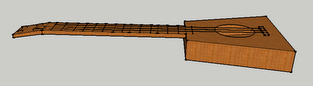
The ukulele was originally developed in the Hawaiian islands during the 19th century. Over time the original guitar shaped ukulele got smaller and transformed into the ukulele we know about today. Then the ukulele transformed shapes and new ukuleles started emerging such as the pineapple ukulele or the cigar box ukulele. We chose to create a pineapple ukulele because the wood didn't need to be bent to fit around the edge of the frame. Also we thought it would be the sturdiest type to support the string tension.
How It Produces Musical Notes:
Our ukulele produces musical notes because when the strings are plucked they vibrate with creates sound waves. The sound waves first are sent into the whole to bounce around and get louder when they come out agin so you can hear it. The ukulele can produce many notes. The easiest four notes are the 'open tuning' notes where you do not adjust the length and just pluck the strings with each have a different diameter and weight. More notes are created by placing your finger on the neck and pinching the string so only part of the string vibrates creating a different note. My calculations (attached below) showed me the tension that the strings would have to be under in order to produce real notes. Then using the tension I figured out in the calculation, I plugged in different lengths into the equation FT = 4 (linear density) L2 F2 (where linear density is 1.1 for nylon strings) to show how more notes would be played with only four strings.
How to Build it:
First what we did was get materials, here is what we needed:
Materials:
- wood (strong wood that still looks pretty and a thick circle piece for the neck)
- tuning pegs
- ukulele strings
- wood stain
- wood polish/coating
Tools:
- drill (drill bits and whole cutter bit)
- sand paper
- bench saw
- hand saw
- sanding block/electric sander
- ruler
- wood glue
- clamps
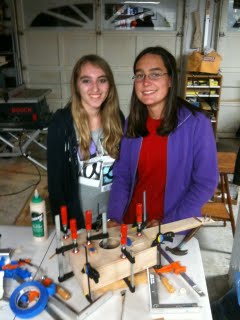
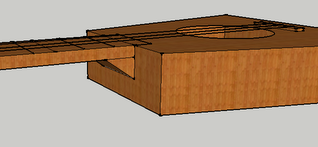
Then, the next thing was to measure and cut the pieces for the sides and the top and bottom. Then we built the neck by cutting the circle piece of wood in half length wise to get a half circle. Next we cut the head by using the table saw and an angle measurer to cut the head on an angle. then we made a block of scrap wood to go inside the body of the ukulele for extra support on the neck. Then we cut the bottom of the neck to legnth using the table saw and left a thin piece to glue for support to the inside of the body. Then we created a support piece to fit under the neck using the electric sander and hand saw. After that we drilled the holes for the tuning pegs in the head and then glued and clamped the back of the body to the sides and bottom. While that was drying, we glued the top side of the body to the block and the head and clamped it. when both parts were dry we glued them together and cut the hole in the top for the sound to vibrate through. Then we glued it onto the body and attached the thing on the bottom to hold the strings. After that was all done, we stained the whole thing. The next step was then to attach the tuning pegs and spray the coating on it. Then we attached the strings and tuned it.
The ukulele was originally developed in the Hawaiian islands during the 19th century. Over time the original guitar shaped ukulele got smaller and transformed into the ukulele we know about today. Then the ukulele transformed shapes and new ukuleles started emerging such as the pineapple ukulele or the cigar box ukulele. We chose to create a pineapple ukulele because the wood didn't need to be bent to fit around the edge of the frame. Also we thought it would be the sturdiest type to support the string tension.
How It Produces Musical Notes:
Our ukulele produces musical notes because when the strings are plucked they vibrate with creates sound waves. The sound waves first are sent into the whole to bounce around and get louder when they come out agin so you can hear it. The ukulele can produce many notes. The easiest four notes are the 'open tuning' notes where you do not adjust the length and just pluck the strings with each have a different diameter and weight. More notes are created by placing your finger on the neck and pinching the string so only part of the string vibrates creating a different note. My calculations (attached below) showed me the tension that the strings would have to be under in order to produce real notes. Then using the tension I figured out in the calculation, I plugged in different lengths into the equation FT = 4 (linear density) L2 F2 (where linear density is 1.1 for nylon strings) to show how more notes would be played with only four strings.
How to Build it:
First what we did was get materials, here is what we needed:
Materials:
- wood (strong wood that still looks pretty and a thick circle piece for the neck)
- tuning pegs
- ukulele strings
- wood stain
- wood polish/coating
Tools:
- drill (drill bits and whole cutter bit)
- sand paper
- bench saw
- hand saw
- sanding block/electric sander
- ruler
- wood glue
- clamps
Then, the next thing was to measure and cut the pieces for the sides and the top and bottom. Then we built the neck by cutting the circle piece of wood in half length wise to get a half circle. Next we cut the head by using the table saw and an angle measurer to cut the head on an angle. then we made a block of scrap wood to go inside the body of the ukulele for extra support on the neck. Then we cut the bottom of the neck to legnth using the table saw and left a thin piece to glue for support to the inside of the body. Then we created a support piece to fit under the neck using the electric sander and hand saw. After that we drilled the holes for the tuning pegs in the head and then glued and clamped the back of the body to the sides and bottom. While that was drying, we glued the top side of the body to the block and the head and clamped it. when both parts were dry we glued them together and cut the hole in the top for the sound to vibrate through. Then we glued it onto the body and attached the thing on the bottom to hold the strings. After that was all done, we stained the whole thing. The next step was then to attach the tuning pegs and spray the coating on it. Then we attached the strings and tuned it.
Reflection:
What went well with this project was the final product. I am very proud of how me and my partner created such a beautiful piece of work and I am proud that we can explain to people why it makes the notes that it does and how we used physics equations to calculate what had to be built to make real notes. What did not go as well was group communication in the beginning. At first we had different ideas of what we wanted to build, I thought we were making a tenor ukulele and my partner thought we were building a soprano. But then we got together outside of school and finalized our blueprints and started building. Another challenge is that both of us had really busy schedules so we had to get together twice, and one time was the monday before it was due to finish on time. But we did finish on time and it looks awesome!
The Habit of Heart and Mind I connected with most on this project was self-advocacy because I usually don't share my opinions on how we should build something and let my partner pick. I also end up doing all of the work but not this time. I feel that on this project my partner and I got along well and we could listen to each other's ideas and choose the idea that would work the best. Overall, I am very proud of our final ukulele.
| scan_uke_copy.pdf |
